Monday, June 6, 2016

A Real World 3D Print: Part 2

So when Part 1 left off, our technology coordinator and I had spent 3 hours trying out different processes to print Braille keychains with students.  At first, we thought that each one could make a letter of the alphabet to start and then they could use each other's letters to make the key chains. Too involved! We finally decided that the easiest thing would be to have them copy the original braille cell I made and remove the dots, just as I did.

I had spoken to a 5th grade teacher about doing it with her math class of about 20 kids.  She was super excited.  The kids came to the library and I had Michelle explain a little bit about what Ivan had been going through.


She also brought some Braille shapes on paper so the students could feel what it was like.  She told the students that Ivan was at a school in Austin learning how to adapt to being blind. I then explained about the original keychain that I had made and how we wanted to make more for the other students at the school.

We brainstormed a list of positive, encouraging words that we could put on the keychains (I forgot to take a picture of that).  Word like: smile, hope, joy, just do it, cheerful, love, shine, etc.  The students picked a word and planned out what the word would look like in Braille.


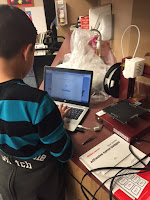
Once the teacher or I checked their Braille, they could begin using Tinkercad to design the keychain.


When they were finished, the teacher or I checked their work to maker sure the keychain was the right thickness, no shapes were poking through the bottom, the hole went all the way through and that the dots were raised to the right height.  The students then wrote the title of their design on a list so I could begin printing them.  


After they were printed, I sent them home with Michelle one weekend so Ivan could "proof-read" them for us to maker sure the keychain said what it was supposed to say.  She was kind enough to record a video for the students...

The students were super excited about this product and really proud of themselves when they had their finished keychain in hand.  They knew they had done something special for the students at the school and felt good about that.  


Wednesday, June 1, 2016

A Few Things I've Learned While Using the 3D Printer

Just a few things I learned while making the Decade Coins with 5th grade.

1. Kids are WAY more creative and better at Tinkercad thank I am.  I have always had trouble visualizing things.  I can not picture how furniture should look in a room.  I actually have to see it in there or move it around.  I had a very difficult time making a sample coin to show 5th grade. I was worried how the kids would be able to connect the different shapes to create what they wanted or if they would get frustrated.  They were much faster and much better at combining the shapes than I was. 

2.  There are different kinds of filament.  Who knew?  Not me.  My 3D printer came with a role of filament and when I was running low, I emailed the vendor that the printer was purchased from and asked him for a quote on white filament for the Afinia printer.  He sent it and I bought it.  

3.  Different filaments have different settings on the printer. When I loaded it and printed for the first time the coin would NOT come off the raft.  It was stuck on there like super-glue.  I thought maybe I had messed up the calibration or the nozzle height so I reset those and printed again.  Still stuck. I emailed Afinia support - which is great by the way.  They sent back some instructions and still stuck.  I went through the whole set up one more time and happened to notice a drop down in front of ABS and remember seeing something about ABS filament.  I looked at the filament that I loaded and it said PLA.  I changed it in the drop down and presto-chango, worked like a charm. I really don't know what the difference is between the ABS and PLA but I found this article if you are interested.

4.  Different filaments take coloring differently.  After I made my sample coins, I tried coloring them with Sharpie marker.  Keep in mind this was on the ABS filament - no good.  The marker bled and looked horrible.  Crayons were no good either.
Sharpie
Crayon
Colored pencils worked great on the ABS filament.

Colored Pencils

Once I loaded the accidently PLA filament, the Sharpie markers looked awesome!  The PLA is a little shinier and maybe seals better so the sharpie doesn't bleed.
Sharpie